Understanding the Septic Tank Installation Process

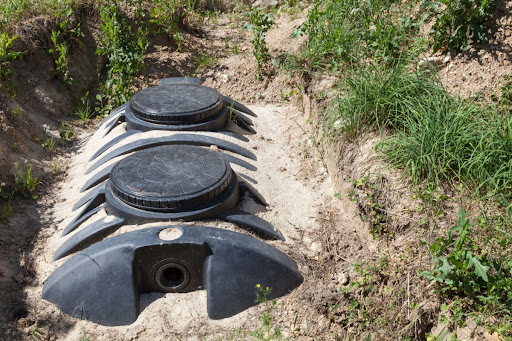
A septic tank installed in the ground.

Understanding the Septic Tank Installation Process

Installing a septic tank is a critical step in managing wastewater for properties not connected to municipal sewer systems. Whether you’re building a new home or replacing an old system, understanding the septic tank installation process is essential to ensure that your system functions efficiently and complies with local regulations. In this comprehensive guide, we’ll walk you through the septic tank installation process, from initial planning and permitting to the final inspection and maintenance tips.

Why Proper Septic Tank Installation Matters

A properly installed septic system is crucial for effective wastewater management. Septic systems treat and dispose of household wastewater, ensuring that it does not contaminate groundwater or surface water sources. Improper installation can lead to a range of issues, including system failures, environmental contamination, and costly repairs.

Proper installation begins with a thorough understanding of local regulations, soil conditions, and the specific needs of your property. Before diving into the installation process, it’s important to recognize that this is not a DIY project. Professional installation is recommended to ensure compliance with local codes and to avoid potential problems down the road. For more on the importance of working with professionals, check out our article on septic system regulations and permits.

Step 1: Planning and Design

The first step in the septic tank installation process is planning and design. This phase involves assessing your property’s needs and determining the best location and type of septic system for your home.

  1. Site Evaluation: A site evaluation is conducted to assess the soil composition, groundwater levels, and the slope of the land. These factors are crucial in determining the type of septic system that will work best for your property. The site evaluation also helps in identifying any potential challenges, such as high water tables or rocky terrain, that could impact the installation process.
  2. System Design: Based on the site evaluation, a septic system designer or engineer will create a plan for your system. This plan will include the size and type of the septic tank, the layout of the drain field, and any necessary components such as pumps or filters. The design must comply with local health and safety codes, which often dictate the minimum distance the system must be from water sources, property lines, and buildings.
  3. Choosing the Right System: Depending on your site conditions, you may choose between different types of septic systems, such as traditional gravity-fed systems, aerobic treatment units, or sand mound systems. Each system has its advantages and is suited to different environmental conditions. For a comparison of different types of septic systems, read our guide on aerobic vs. anaerobic septic systems.

Step 2: Permitting and Regulations

Before installation can begin, you’ll need to obtain the necessary permits from your local health department or building authority. This process ensures that your septic system meets all local regulations and is safe for your property and the environment.

  1. Permit Application: The permit application typically requires submitting the septic system design, along with a site evaluation report, to the relevant authorities. Some areas may also require a fee to process the permit. The application will be reviewed to ensure that the proposed system complies with local health and safety codes.
  2. Regulatory Compliance: It’s important to be aware of any specific local regulations that may apply to your installation. These can include requirements for system sizing, setbacks from water sources, and ongoing maintenance. Non-compliance with these regulations can result in fines, delays, or even the need to redesign or replace your system. For more information on staying compliant, refer to our comprehensive guide on septic system regulations.
  3. Environmental Considerations: Depending on your location, there may be additional environmental regulations to consider, particularly if your property is near sensitive ecosystems, wetlands, or water bodies. These regulations often include guidelines on how the septic system should be designed to minimize its environmental impact.

Step 3: Excavation and Tank Placement

With the permits in place, the next step is the physical installation of the septic system, starting with excavation and tank placement.

  1. Excavation: The area designated for the septic tank and drain field will be excavated according to the specifications outlined in the system design. This involves digging a large hole for the septic tank and trenches for the drain field pipes. The depth and dimensions of the excavation will depend on the size of the tank and the type of soil.
  2. Tank Placement: Once the excavation is complete, the septic tank is carefully placed into the hole. The tank must be level to ensure proper operation and prevent uneven settling over time. After placement, the tank is connected to the home’s plumbing system and the drain field.
  3. Drain Field Installation: The drain field, also known as the leach field, is installed by laying perforated pipes in the excavated trenches. These pipes allow effluent from the septic tank to disperse into the soil, where it is naturally filtered and treated. Proper installation of the drain field is crucial to prevent issues like clogs or backups. For more on maintaining a healthy drain field, check out our article on how to unclog a drain field.

Step 4: Connecting the System and Backfilling

Once the tank and drain field are in place, the system is connected, and the excavation is backfilled.

  1. System Connection: The septic tank is connected to the home’s plumbing system through a series of pipes. These pipes carry wastewater from the house to the tank, where it is treated before being discharged into the drain field. It’s essential to ensure that all connections are secure and leak-free to prevent contamination and system failure.
  2. Ventilation and Inspection Ports: Proper ventilation is necessary to allow gases produced by the septic system to escape safely. Inspection ports are also installed to provide access to the tank and drain field for future maintenance and inspections.
  3. Backfilling: After the system is connected, the excavation site is backfilled with soil. The soil is carefully compacted to avoid settling, which could damage the system. In some cases, the area may be regraded to ensure proper drainage away from the septic system.

Step 5: Final Inspection and System Testing

Before the system can be put into operation, it must pass a final inspection and undergo testing to ensure that it is functioning correctly.

  1. Final Inspection: A representative from the local health department or building authority will conduct a final inspection of the system. This inspection checks that the installation was completed according to the approved design and that all components are working correctly. Any issues identified during the inspection must be addressed before the system can be approved for use.
  2. System Testing: The system is tested by running water through the plumbing and monitoring the flow of effluent into the septic tank and drain field. This testing helps to identify any potential issues, such as leaks or improper drainage, that could affect the system’s performance.
  3. Approval and Documentation: Once the system passes the inspection and testing, you will receive approval from the permitting authority. It’s important to keep all documentation related to the installation, including the system design, permits, and inspection reports, for future reference and maintenance.

Step 6: Post-Installation Maintenance and Care

After installation, ongoing maintenance is essential to keep your septic system functioning efficiently and to avoid costly repairs.

  1. Regular Pumping and Inspections: Your septic tank should be pumped every 3 to 5 years, depending on the size of the tank and the number of people in your household. Regular inspections are also necessary to identify potential issues before they become serious problems. For more details on maintaining your septic system, refer to our guide on septic tank pumping.
  2. Water Conservation: Conserving water in your home can reduce the load on your septic system and extend its lifespan. Simple measures like fixing leaks, installing low-flow fixtures, and spreading out laundry loads can make a big difference.
  3. Avoiding Harmful Substances: Be mindful of what goes down your drains. Avoid flushing or pouring chemicals, grease, and non-biodegradable items into your septic system, as these can cause clogs and damage the system. For more information on what to avoid, check out our article on items that should never go down your septic system.


Ensuring a Successful Septic Tank Installation

Installing a septic tank is a significant investment in your property’s infrastructure. By following the proper steps and working with experienced professionals, you can ensure that your septic system is installed correctly and will provide reliable service for years to come. Understanding the septic tank installation process, from planning and permitting to final inspection and maintenance, is key to protecting your investment and avoiding costly mistakes.

For homeowners in McHenry and Lake County, IL, Tidy Tank Septic Service offers expert installation services, ensuring that your septic system is designed and installed to meet all local regulations and your property’s specific needs. Whether you’re building a new home or replacing an old system, our team is here to guide you through every step of the process.

For more information on septic system installation and care, visit our full range of services and blog articles.

Share

Facebook
Twitter
LinkedIn